2 years ago
 Level 100 CI Flicker Strike Trickster3.20
Life: 1
ES: 8,313
Mana: 122
Int: 652
eHP:
1,252,220
Resistances: 75%/81%/75%/-60%
Block: 50%
Spell Block: 50%
Armour: 96,678
DPS: 6,017,988
Speed: 8.67
Hit Chance: 100%
Config:
Pinnacle, 15% Shock, Frenzy, Custom Mods
Bandit: Kill All
Pantheon: Soul of Solaris
Gear


Gems
Molten Shell
Cast when Damage Taken
Frenzy
Culling Strike
Wrath
Discipline
Enlighten
Grace
Vaal Flicker Strike
Awakened Multistrike
Damage on Full Life
Close Combat
Awakened Elemental Damage with Attacks
Awakened Lightning Penetration
Portal
Enlighten
Ancestral Protector
Multiple Totems
Ancestral Warchief
Flame Dash
Conductivity
Tree Preview
 Chaos Inoculation
 Iron Reflexes
 Versatile Combatant
 Armour Mastery
- You take 30% reduced Extra Damage from Critical Strikes
 Armour and Evasion Mastery
- 8% increased Evasion Rating per Frenzy Charge
- 8% increased Armour per Endurance Charge
 Block Mastery
- 3% increased Attack Damage per 5% Chance to Block Attack Damage
 Elemental Mastery
- Exposure you inflict applies at least -18% to the affected Resistance
 Energy Shield Mastery
- Gain 3% of Maximum Mana as Extra Maximum Energy Shield
 Evasion Mastery
- 100% increased Evasion Rating from your Body Armour
 Evasion and Energy Shield Mastery
- +1 to Energy Shield per 8 Evasion on Boots
- 30% increased Evasion Rating while you have Energy Shield
 Lightning Mastery
- Lightning Damage with Non-Critical Strikes is Lucky
 Reservation Mastery
- Auras from your Skills have 10% increased Effect on you
 Shield Mastery
- +1% Chance to Block Attack Damage per 5% Chance to Block on Equipped Shield
 Sword Mastery
- 8% chance to gain a Frenzy Charge when you Hit a Unique Enemy
Notes
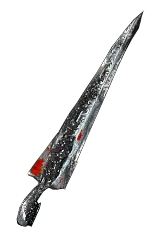
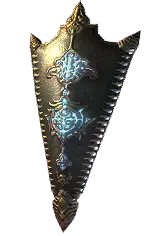
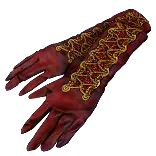
Welcome to my Ephemeral Edge Flicker Strike Trickster Guide! I hope you enjoy it and have fun!

You can follow live updates with my character on the POE ninja profile right here:

https://poe.ninja/challenge/builds/char/Dreadmaker7/ImmortalFlickerMapper

You'll notice the DPS is almost half of what it is here - the POB number is more accurate! The poe ninja version doesn't have precise technique (because it's on my relic), and it hasn't set my melee distance, thereby not showing the damage from
close combat support - so that would be my damage on a 5-link, without a 40% more multiplier. :)


NOTES ON USING THIS POB:
-----------------------------------------

There are three different "modes" in this POB - Budget, Current, and Aspirational. For each one, make sure that you switch the skills tab, the items tab, AND the tree tab to the correct version.
All 3 versions should be res capped and not have any warnings - if you have one, probably you haven't swapped one of them to the right tab.

Roughly speaking, the budget version is around 1.5 million single target shaper DPS. It also boasts around 500,000 effective hit pool (with flasks up). The budget should be around 5-10 divines (and probably less)
My current set up is right about at 6 million. It also has about 1.2 million effective hit pool (with flasks up). My current investment is reasonably high - probably around 80 divines or so, but some of this is definitely unecessary (like Oriath's end).
Aspirational/maximum damage is around 13.7 million. It also has about 1.5 million effective hit pool (with flasks up). The budget for this is extremely high - basically, whatever investment you can make, it will pay itself back to some extent.

If your values don't match these when swapping to a given view, make sure to check that all 3 tabs are on the right setting!

Additionally, if you're curious about how I arrived at the configuration settings that I did, please jump to the bottom of this notes section - all the settings are explained!


MOTIVATION FOR THE BUILD:
--------------------------------------

I love playing Flicker strike. However, I also get really frustrated with dying all the time when playing flicker strike. Anyone who's played it gets it - it's real hard to not take a bunch of unintentional damage and die.
At first, I was looking at building an energy blade trickster, since it would necessarily have to have a really high ES pool to succeed - but then I realized that ephemeral edge was reworked!
Ephemeral edge gives _most_ of the same benefit that energy blade does, but without having to sacrifice any of your ES. 20% of 100% is the same as 40% of 50%, right - but you don't get to use it
with battlemage, and you don't have the option of using it 2-handed. For us, that's no problem at all!

Once I realized that, going for Aegis aurora and iron reflexes just made sense as a defensive base, and the trickster is a phenominal ascendancy all around, but especially defensively. Everything else has been
figuring it out as I've gone, and it likely isn't perfect yet! But, nonetheless, it feels pretty great, and hopefully it will only get better from here.

This build is primarily a MAPPING character. It's not a bosser, although with high investment, like anything, it can certainly do pinnacle bosses - I've killed Sirus and Uber Elder with the build, for example.
I haven't attempted any ubers with it yet, and I'm not sure it'll be capable of them without _extreme_ investment, but again, that's not the point - it's a mapping character that can handle most juicy mapping
content in the game, including simulacrum, heavy deli, juiced maps in general, etc. It has 3 map mods you don't want:

- Cannot leech: this actually hurts more for the lack of mana sustain than for the defense, but obviously it's a big part of defense too. It also hurts us by turning off 20% more attack speed and 20% increased damage nodes while leeching. Not great.
- Cannot regenerate: this isn't necessarily a dealbreaker, but again, it sucks most for mana. It could be mitigated with a mana flask. It essentially works just fine as long as you're not using your movement abilities in-between packs However,
I tend to just roll over this one because it's super annoying, and I don't want to swap to a mana flask.
- Enemies steal Frenzy, Endurance, or Power charges on hit: This bricks us pretty bad. If you have no frenzy charges, you have no flicker. Getting your frenzies killed all the time _really_ blows. This is the top one to avoid.

For regular mapping, you don't need to use your curse or totems. Hold down right click, and let it rip.
However, for tanky rares or bosses, you'll want to put down both of your totems and curse them before you get started. Then, especially if you don't have anything else around, I like to open up with vaal flicker to potentially get a big shock and a lot
of damage in, and then go from there. Vaal flicker is also a great tool if you're out of frenzy charges for whatever reason. It's not quite as good when there's a lot of adds around, but it can still be great for getting charges back.


HOW THE BUILD WORKS:
-----------------------------------

Offense:

Offensively, the build works by stacking energy shield for ephemeral edge's ability to convert that ES into flat maximum lightning damage. The problem with this is that it's all _maximum_ lightning damage, and so in order to
help to maximize that added maximum damage, we're going completely non-crit, and using the lightning mastery that says your non-crit damage is lucky. This has a huge, huge impact (about 25% of our overall damage).
In order to capitalize on our non-crit choice, we're also going for resolute technique so as to not need to worry about accuracy, and also precise technique in order to get a "free" 40% more damage multiplier.
Beyond this, the key is just stacking ES, intelligence (for its contribution to ES), and flat added lightning damage to attacks where possible.

One question I often get is about frenzy charge sustain - you actually don't tend to need help with this, because the baseline of 20% chance we have with 20% vaal flicker is enough when combined with multistrike and melee splash.
However, we do also have frenzy with culling strike slotted in to help us if we do run out or want to accelerate up to our limit quickly, and it has the benefit of also having culling strike if we want that.
In practice, though, once you get awakened multistrike, you won't really need help while mapping anymore, and also not while bossing after you get up to your limit.

Defense:

Defensively, the build has many layers of defense and recovery. First, our core trick is using Aegis Aurora + iron reflexes to get a very high amount of armor. This means that on current gear, we're getting back something like 2,000 ES
whenever we block. And, since we're using Versatile combatant, we have 50% true attack and spell block. It's not as high as I'd like for aegis, but it's certainly good enough (from experience!). Beyond that, we're of course Chaos Innoculation,
meaning that we're immune to chaos damage completely, and we have very high energy shield leech from the trickster ascendancy. We're also fully elemental ailment immune, due to stormshroud and a few gear items that have shock avoidance.
This is maybe frivolus, but we also have the synth implicit unwavering stance on our boots, meaning we're completely stun immune. As a result, you can see our effective hit pool - especially when boosted by flasks, it's very hard to die.


PROGRESSION FROM BUDGET TO ASPIRATIONAL:
------------------------------------------------------------------

We'll talk very specifically about the gear in a moment, but there are a few really big "milestones" when it comes to budget.

1. You can get started on the build with only an aegis aurora, ephemeral edge, bronn's lithe, and shavronne's revelation. The last two even are somewhat optional, but easy enough to get that you may as well start with them.
When I was making this build, I actually swapped to it right at maps - as soon as I could use the aegis, in fact. I originally used darkray vectors to help a bit. It might be better to wait longer than that, but it IS possible that early if you like.
With only the aegis, bronn's lithe, and the ephemeral edge, I actually did some early leveling in simulacrums, because it's already tanky enough for that right from then - your damage will be too low to go much beyond wave 20, though.
2. If you're on very low budget, you don't use stormshroud (or a watcher's eye). As a result, we're switching Wrath to Purity of elements for our ailment immunity and to help out with resistance in early gearing.
3. Additionally, on a low budget, we're going to be dropping a cluster jewel altogether, and using the tree to get both a little bit of mana leech as well as Precise Technique as a notable. Later, we get the mana leech from the cluster,
and we get Precise Technique from a Lycia's Invocation that we add to our santified relic.
4. At low budgets, we drop awakened gems altogether. They will be one of your first upgrades, though - Awakened Lightning Penetration and Awakened Elemental damage with Attacks in particular are important for exposure and reflect immunity.
Awakened multistrike can wait until a good deal later - but it does feel real nice when you get there.


GEARING CHOICES:
---------------------------

Full disclaimer right at the top: Basically everything in the build, to some extent, can be a trade-off between offense and defense. For example, I've chosen to go for a high DPS body armour, where in fact I could have gotten a higher ES pool and
better damage reduction with a more defensive one, for example - and other items I've made more defensive than offensive choices. You might want to make opposite or otherwise different choices. That's okay! For each item, I'll explain the logic,
and what I'm trying to get out of the slot. From there, make your own choices about what makes sense! Definitely possible I've missed a mod here or there, and my choices
could be improved - let me know if you find some other cool option!

We'll start with the "set" choices, and then we'll move to the more optional ones.

Weapon:

Right from the top, here's a non-negotiable: We're using Ephemeral edge. That's pretty much the whole build right there. For low budget, you can not have the RT corruption, but if you do that, you'll either need lots of accuracy elsewhere,
or you'll need to get the keystone for your sanctified relic (which should be cheap). The RT corruption unfortunately is pretty key, but happily it's one of the only difficult to access pieces in the whole kit.

Shield:

Again, a non-negotiable: Aegis Aurora is the crux of our defense. Without it, it's not really the same build anymore, and you lose a lot of sustain.

Body Armour:

This one is potentially more negotiable, but I would strongly recommend using Bronn's Lithe here. It's hard to beat for us from a DPS perspective: up to 100% increased flicker strike damage, plus 5 levels onto flicker.
Extra attack and movement speed is a nice bonus. The real key that makes Bronn's Lithe so incredible here for us is the Trickster's Ascendancy node, Escape Artist. Escape Artist gives us 1 ES per 6 evasion on body armour,
meaning that a well-rolled Bronn's Lithe can give us almost 400 flat ES _in addition_ to the 2200 evasion, which ultimately is responsible on my current gear for about 1400 ES.

Although you _could_ get a rare vaal regalia that has much more flat ES, it would not result in more damage, due to the 100% increase and +5 levels to flicker Bronn's Lithe gives us. It would be possible to be much more defensive
with this slot, for sure, but in my personal opinion, it's not worth it because of the trickster ascendancy giving us so much benefit from using this.

Ring 1:

This is our last "non-negotiable" item - We're using a Shavronne's Revalation in this slot. Why? Because there's no way to get more ES out of a ring slot than this thing. Not only can we get up to 75 intelligence on it, but
with defense catalysts, we can get 330 flat ES out of the ring, which is almost the same as our chest piece is giving us! It does make it so we no longer regenerate ES, true, but with all of our leech and aegis recovery,
you don't miss it. One key recommendation, though: If you're going to run lab with this character regularly, just take the ring off when you do. Obivously not having any recovery when you're getting hit by lab traps isn't great.

Or, just don't get hit. :)

(I for sure get hit, and when I run lab, I take the ring off.)

Helmet:

For the helmet slot, we _need_ a hubris circlet, because it's the slot we're going to get the most ES from outside of the chest and ring. In addition, the Trickster ascendancy is going to be giving us free evasion for all the ES on our
helmet, so a hubris circlet just makes sense to capitalize. So the number 1 goal here, budget or not, is a high ES pool, simple as that.
From there, you want to add in intelligence and resistances. Finally, at a higher budget, when you have stormshroud for your ailment avoidance, you'll want to have % chance to avoid being shocked on the helmet.

To craft this, it's relatively simple, although it's annoying because of those restrictions. Basically:

1. Spam torment essences to get at least 50% chance to avoid being shocked, plus intelligence and a resistance. Don't worry about your prefixes for now.
2. Once you have really nice suffixes that you like, add on exarch influence. It doesn't matter what the mod is for now.
3. (the expensive part): spam the hell out of eldritch chaos orbs, which will reforge only the prefixes because your piece is exarch dominant. Do this until your ES is as high as you like (ideally 300+).

Gloves:

Here's our first _real_ difference between Budget and Aspirational. Let's do the budget first. Much like the helmet, the key here is high ES and high intelligence, and whatever resistances you need to fill in. That's it!
The higher the ES and int the better, and the rest is just filling in whatever else you need. For influence, you'll want to get eater and exarch on there, and you actually want one specific mod: chance to intimidate on hit.
That's a 10% _more_ damage multiplier for us, and this is a very convenient way to get it. Additionally, if you don't have awakened lightning penetration yet, you can also go for lightning exposure on hit, which will also really
help the damage.

The higher budget version, though, is much more expensive. We still need intimidate, but we also want +1 frenzy charges, which is possible through conqueror influence. We're going to need a double-elevated, double-influenced pair
of gloves, and that's probably not going to be cheap. Here's how you can craft it:
1. Get a pair of warlord influenced gloves. Either chaos spam or alt/regal spam for +1 frenzy mod, and one other warlord mod (doesn't matter which).
2. Once you have that, grab an orb of dominance, and slam it. If your frenzy mod got elevated, you can move on - otherwise, go back to step one and start over.
3. Do the same thing for hunter gloves. This time, we're looking for the % chance to intimidate, and we want to elevate that. This is optional, but honestly, at this budget, why wouldn't you want to elevate it?
4. Once you have both of your elevated gloves, use an awakener orb to slam them together. In a perfect world, you have an open suffix, and you either have a defensive prefix or an open one. If not... Yolo annul, unfortunately, unless they're already
in a pretty perfect state. Presumably, though, you'll want to roll suffixes to get res/int. If you already have that, though, maybe the job is already done!
5. This is where it gets real hard. You're now going to do "prefixes can't be changed" and use whatever crafting option makes the most sense for the state of the gloves. That could be harvest reforge defense if you have an open prefix,
or it could be something like a veiled chaos, or it could be a reforge more/less likely depending on the mods already there.
6. The end goal is to have a high intelligence roll, and a resistance. In a perfect world, attack speed, too. But really, for the level of difficulty and randomness inherent in this part (and expense), you probably just want to take a good defense roll,
Int, and call it a day - anything else is a bonus.

It's possible there's an easier way to finish those guys - if so, let me know! I'm struggling to make those for myself at the moment, and the struggle is real!

Boots:

Boots here can be quite easy, but if you do what I did and go for unwavering stance as a synth implicit, they'll be quite hard. Again, for budget, it'll be as simple as high ES, int, res, and movement speed. However,
Once we're at the stormshroud stage, you'll want to do the same as the helmet - torment essences for at least 50% chance to avoid shock. Those two items cap you out there. However, unlike the helmet, you aren't able to
eldritch chaos spam, because you can't have eldritch influences on a synth implicit - it'll overwrite the implicit, thus defeating the purpose completely. So, for that it's more likely you'll be doing suffixes can't be changed ->
veiled chaos slamming for one of the better movement speed mods.

Alternatively, if you can get the shock avoidance on an abyss jewel, your life will be easier here, and you can drop it to just focus on ES, int and res, best crafted _probably_ with dense fossils.

Belt:

The budget belt is as simple as an Auxium. It's not incredible, but it has high ES, and is about 1c on the market, and it's not at all a bad budget belt.
For a rare belt, you're looking for a crystal belt, ideally crusader influenced. You want your suffixes to just be intelligence and two resistances, but for the prefixes, you want ES, elemental damage with attacks, and
ideally, if you have the crusader influence, % increased ES (which actually beats out % increased lightning damage, funny enough).

Likely the best crafting method here is spite essences to get the suffixes you want, prefixes can't be changed, veiled chaos for something like evasion + ES (which is what I currently have), and then close your eyes and
slam a crusader's exalted orb on a hopefully open prefix. If you're lucky, you'll hit lightning damage or % ES, and you'll be having a great day.

Ring 2:

The budget version here is a moonstone ring (so ES implicit), and quite literally whatever you need to fill out the build. That'll likely include some resistances, as well as strength. Beyond that, the standard ES and intelligence is what you're after.

The non-budget version is of course a +1 max frenzy implict synth ring. It's still a filler slot - you still want to put strength here, res, and intelligence - whatever you need to make everything else work. But, you'll also have +1 max frenzy, which is big.

Amulet:

The Amulet is another flex slot, like ring 2 - it's a great place to get anything (like strength) that you need and you're missing. If you aren't missing anything, though, You'll want intelligence, max energy shield, elemental damage with attacks, and res.

The higher budget option is much like in other places - you'll want crusader influence here, and you'll specifically want the influenced mod "lightning damage penetrates % of enemy resistance". This can get up to 10% lightning pen, which is
absolutely massive for us. Everything else is basically the same after that.

You'll want to anoint Tribal Fury for the "free" melee splash - it saves us a gem slot on our flicker, and lets us have 5 damage supports, instead of splash for quality of life.
EXPERIMENTAL: I haven't tried this, but it's possible that slightly re-routing the tree to get the "strike skill strike an additional nearby target" mastery _might_ be enough to map comfortably without this anoint. If that's the case,
You could then use a damage anoint, and that could potentially be very big. Would need to see how it feels before I recommend this.

Flasks:

The only thing you MUST have here is an "immunity to bleeding and corrupted blood during flask effect" flask, which I have on my jade flask. Beyond that, for a budget option, literally any defensive flasks will do. Granite and Stibnite is what I
originally used. I also add to that a silver flask for onslaught, and in a perfect world, a bottled faith. If you don't have the budget for that, you can go for another defensive option, like a basalt flask, or even a normal sulphur flask for damage.

People ask me all the time if oriath's end is worth it. For most normal content, I'd say it isn't really, necessarily - our clear is fine without it. However, if you're doing flawless breachstones, heavily delirious content, or anything in that
general realm of high density and tanky mobs, it absolutely _is_ worth it. It definitely does help the clear, and if you want to be doing more difficult mapping with it, that will help immensely. Not _at all_ required to get started, though.


CONFIGURATION SETTINGS EXPLAINATION:
------------------------------------------------------------

POB warrioring sucks, and it's a reality that we live in. I've tried very hard to NOT inflate the DPS here in any way beyond what is regularly achievable while mapping, and in this section I hope to explain how I got there, so if you dislike how I've
configured it, you can re-configure to your liking. Below are all of the settings I've ticked off, along with why they're ticked off.

Always on full life: We're CI, so our full life is 1. If we aren't on full life, we're dead.
Do you always have ES?: Again, we're CI, so if we don't have ES, we're dead.
Do you use Frenzy Charges?: We're Flicker strike, so we functionally always have maximum Frenzy charges through simply hitting packs with multistrike and melee splash.
Do you use Endurance Charges?: This is ticked because of a notable passive we have that gives us a chance to get endurance charges on block. This is regularly up while mapping, but it is NOT a guarantee if you kill too fast.
Are you Leeching/Are you leeching ES?: We are permanently leeching because of the Trickster Ascendancy. If we're not leeching, you're on a leech disabled map, or you're dead. Either isn't great.
Do you have a flask active? I ticked yes, because our flasks are essentially permanently up while mapping. If you want to look at this strictly as a bosser, you can turn this (and all flasks) off.
Melee Distance to enemy = 1: This is to make close combat support correctly calculate. We are permanently in melee range with anything we're hitting, because flicker warps us there.
Is the enemy Shocked?: We only have a 25% chance to shock because of conductivity, since we have no other chance and never crit. This is effectively only up on hard rares or bosses. Since we're hitting ~9 times a second, 25% will
proc within a second, for sure, and they'll effectively be permanently shocked. The shock values vary substantially, but in general, 15% is on the low end of what you'd expect. POB says that we should be shocking pinnacles at about 28%,
but I've set it to 15 to be conservative. You should be safe with this assumption. If you want to presume we'll never shock, you can turn it off, or, if you want it to be more accurate, you can turn it up from 15 to 28.
Is the enemy exposed to lightning/Is the enemy intimidated?: Both of these are coming from our gloves, or in the case of exposure, our awakened lightning penetration gem. Again, even though both are only a chance to activate, since we're
hitting 9 times a second and each buff lasts for 4 seconds, it is _exceedingly_ unlikely for these to not be permanently up.  If you don't have the awakened gem or the eldritch influenced mods, turn these off.
Is the enemy on Consecrated ground?: This is only relevant for bottled faith. Given the size of bottled faith and the fact that you're melee, it's very likely that in your typical boss fight, the boss will be on consecrated ground often.
If you feel that this isn't a fair assumption, turn this one off. During mapping, it will be up for map bosses and any hard rares, no question.
Custom Modifiers: Precise Technique is here because for the higher budgets, you'll need this on your sanctified relic. I didn't want to assume what people had on their relics, but since with the new consumables you can add whatever
keystone you want to your relic, this is an important (and cheap) add-on. If you don't have it on your relic (which I assume you don't in the budget version), you can just allocate it on the tree at the cost of 3 points. It's essentially mandatory
to have it in one of the two places.