6 months ago
 Level 96 Crit Split Arrow Deadeye3.27
Life: 4,839130%
Mana: 101
eHP:
88,371
Resistances: 75%/76%/75%/66%
Evade: 93%
Evasion: 47,318
DPS: 32,860,176
Speed: 2.97
Hit Chance: 100%
Crit Chance: 100.00%
Crit Multi: 426%
Config:
Frenzy, Power, 15x Wither, Custom Mods
Bandit: Kill All
Pantheon: Soul of the Brine King, Soul of Ryslatha
Gear


Gems
Frenzy
Power Charge On Critical
Despair
Manaforged Arrows
Creeping Frost
Cast On Critical Strike
Purity of Elements
Vitality
Grace
Precision
Enduring Cry
Blood Rage
Assassin's Mark
Mark On Hit
Immortal Call
Purifying Flame
Cast when Damage Taken
Flame Dash
Split Arrow
Barrage Support
Mirage Archer
Returning Projectiles
Awakened Void Manipulation
Awakened Vicious Projectiles
Tree Preview
Tattoo of the Tasalio Bladedancer
Attacks have 5% chance to Maim on Hit
Tattoo of the Tasalio Warrior(x2)
5% chance to Blind Enemies on Hit with Attacks
 Huntleader
 Accuracy Mastery
- +500 to Accuracy Rating
- -2 to Accuracy Rating per Level
 Bow Mastery
- Increases and Reductions to Projectile Speed also apply to Damage with Bows
 Critical Mastery
- +25% to Critical Strike Multiplier against Unique Enemies
 Dagger Mastery
- Critical Strikes have Culling Strike
 Evasion Mastery
- +15% chance to Suppress Spell Damage if Equipped Helmet, Body Armour, Gloves, and Boots all have Evasion Rating
- 100% increased Evasion Rating from Equipped Body Armour
 Leech Mastery
- 5% of Leech is Instant
 Life Mastery
- 15% increased maximum Life if there are no Life Modifiers on Equipped Body Armour
 Mana Mastery
- 12% increased Mana Reservation Efficiency of Skills
 Reservation Mastery
- 8% increased Damage for each of your Aura or Herald Skills affecting you
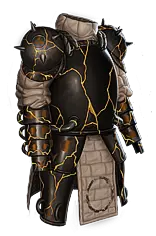
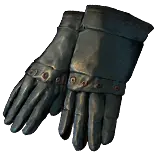
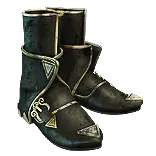
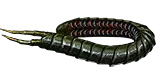
Notes
Pros & Cons:
Pros
+ Great clear
+ Great (potential) DPS
+ Decent survivability
+ Only requires 1 unique

Cons
- Fury valve is kinda mandatory, levelling you can use Rain of Arrows in the mean time.
- DPS is extremely skill-dependent, you can miss your shots alot of the time.


Offensive layers:
1. Extremely high number of hits / second (with high %effective damage).
Very good to trigger things like unholy might, build wither stacks, culling, blind, maim, instant leech, etc.

2. 100% Phys to Chaos from Unholy Might
Bypass alot of annoying modifiers like max ele res / phys reduction and life gain as ES.
Still can't play phys reflect maps since our initial hits are physical.

Defensive layers:
1. Evasion + Spell Suppression + Elemental Ailment immunity
Evasion from Grace, tree & gear (plus Blind)
Spell Suppression from tree & gears
Ailment Immunity from Purity of Elements

2. High Instant Leech
Paired from number of hits from skill + #split + Leech mastery

3. Less damage taken from Wind Ward + Kintsugi + Immortal Call
When you do get hit, applies multiple layers of less damage taken
Up to 40% less damage taken from Wind Ward at max stacks
35% from Kintsugi if not hit recently
25% from Immortal Call from CWDT setup


Mastery, Ascendancy, Bandits & Pantheon
Important Mastery :
1. Leech mastery (5% leech is instant)
2. Dagger mastery (Crits are Culling Strike)
3. Bow mastery (projectile speed = damage w. bows)

Ascendancy :
1. Gathering Winds
2. Far Shot (try to get Fury Valve by this time here)
3. Occupying Force
4. Huntleader (Farrul bloodline) These minions are great as they hug & crowd around bosses, allowing you to easily offscreen and target them
5. Wind Ward (Forbidden Flame & Forbidden Flesh)

Bandits :
Kill all (1 points)

Pantheon :
Soul of Brine King for stun avoidance
Soul of Ryslatha for life flask


Gem setup:
Main Skill Barrage (Split Arrow):
Split Arrow + Barrage support + Mirage Archer + Returning Projectile + (Awakened) Void Manipulation + (Awakened) Vicious Projectile
Main skill. Barrage support needs to be paired with Fury Valve, recommend to play other skills if not available yet.
!!!Returning Projectiles allow us to trigger Mirage Archer on return, bypass downside of Fledgeling can't hit enemies at close range.
Mirage Archer somehow can hit enemies at close range (do not inherit Fledgeling downside)!!!

Manaforged Support
Frenzy +  Power Charge on Crit + Manaforged Arrow + Cast on Crit + Despair + Creeping Frost
Frenzy for frenzy charge, power charge on crit for power charge.
Cast on crit to cast Despair for -chaos res & Creeping Frost for chilling enemies.
If links are not available yet, drop Creeping Frost then Despair (and Cast on Crit) and manually cast Despair during bossing.
Use Despair only once you've increased curse limit from Whispers of Doom

Aura
Grace + Purity of Elements + Precision + Enlighten / Vitality
Grace for evasion
Purity of Elements for resistances & ailment immunity
Precision for accuracy
Use Enlighten if required, or Lvl 1 Vitality if you can fit it in (Vitality has great watcher eye mod - life gain on hit)

CWDT
CWDT + Immortal Call + Purifying Flame
Standard Guard skill. Purifying Flame for life regen from consecrated ground

Mark on Hit
Mark on Hit + Assasin's Mark
Standard automated mark setup

Utility 1
Flame Dash, Enduring Cry, Blood Rage
Flame Dash as movement skill
Enduring Cry for Endurance Charge generation during bossing
Blood rage for attack speed


My Gear + Explanation:
Weapon:
High PDPS Bow w. high base crit chance:
Progressively upgrade into endgame version.

Quiver:
Drillneck > High life + DPS quiver (Vile Arrow Quiver base for phys gain as chaos)
Drillneck is great early game for +1 pierce and damage, endgame transition to rare Vile Arrow Quiver with Life + as many DPS mods you can fit in.

Helmet:
Rares > Fledgeling
Fledgeling is great for damage and projectile speed. Downside of not being able to hit at close range can be mitigated somewhat from using Mirage Archer (they do not suffer from it).

Body Armour:
Rares > Kintsugi
Kintsugi BIS for evasion + less damage taken mod.

Gloves:
Rares > Double Influenced Rare
Life + Attack speed + Life Regen + Spell Suppression
Best implict: +1 Pierce & gain Rage on attack

Boots:
Rares > Double Influenced Rare
Life + Movement speed + Spell Suppression + Res
Best implict : %life regen rate & action speed
!!!Need a combined Spell Suppression roll of 22% from gloves and boots!!!


Belt:
Belt of the Deceiver > Ryslatha's Coil
For Ryslatha, get high max attack roll w. low min attack roll and catalyst it.

Rings:
Kikazaru + Rare > 2 Rares
Kikazaru is great during levelling
1st Rare ring to roll Life + Int + Res. -Flat mana cost is nice craft.
2nd Rare ring to roll Life + Res + Life regen

Amulet:
Fury Valve
Mandatory, build enabling unique.
Best anointment: Whispers of Doom (to enable Despair + Assassin's Mark)

Jewels:
- Lethal Pride near Ranger tree for +str (Damage, intimidate, gain end charge on kill is nice to have)
- Lioneye's Fall near Shadow tree to change claw & dagger node to bow nodes
- Large Cluster Jewel - Overwhelming Malice for Unholy Might (100% Phys to Chaos & chance to Wither)
- Watchers Eye for additional chance to evade while affected by Grace. Precision and Vitality (if slotted) also has some very nice mods, pick whichever you like.
Precision's flask charge on crit & Vitality's life gain on hit is extremely good if you can find one, but mandatory is Grace's evade chance.
- Forbidden Flame & Flesh for Wind Ward (generally cheap)

Tattoos for chance to inflict blind & maim

Flasks:
1.Bleed life flask
2.Silver Flask (Flexible suffixes - %life regen (crafted) / %reduced curse effect / %evasion / %crit chance)
3.Jade Flask
4.Stibnite Flask
5.Amethyst Flask (Flexible slot, can use unique flasks if you want)
Get gain charges on hit prefix for all utility flask