2 years ago
 Level 59 Flameblast Elementalist3.21
Life: 2,411122%
ES: 206
Mana: 259
eHP:
17,742
Resistances: 75%/75%/75%/-22%
Speed: 8.05
Hit Chance: 100%
Config: Boss, 15% Shock
Bandit: Alira
Gear

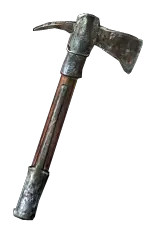
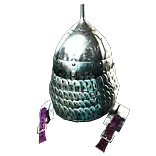

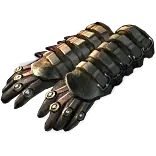
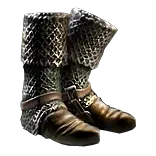


Gems
Flameblast
Burning Damage
Swift Affliction
Cruelty
Armageddon Brand
Inspiration
Combustion
Cruelty
Leap Slam
Momentum
Faster Attacks
Frostblink
Arcane Surge
Flame Surge
Wave of Conviction
Spell Totem
Determination
Steelskin
Flammability
Blood Rage
Summon Skitterbots
Primal Aegis
Tree Preview
- 60% increased Damage while wielding two different Weapon Types
- Regenerate 1 Life per second for each 1% Uncapped Fire Resistance
- Critical Strikes do not inherently Ignite
- 100% increased Damage with Hits against Ignited Enemies
- Skills cost Life instead of 30% of Mana Cost
- +50 to maximum Life
- Auras from your Skills have 10% increased Effect on you
Notes
---Required Links---

	Travel Setup As Soon As Possible:
		Flame Dash (B) until Library
        Leap Slam (R) - Faster Attacks (G) - Momentum (G) if you have an 3rd G
		* Can supplement Leap Slam with Frostblink (B) if you want some additional speed

	Lvl 1 and Beyond:
		Rolling Magma (B) - Ele Prolif (B) - Combustion (B) / Arcane Surge (B) until you have combustion

	Lvl 18 and Beyond:
		Rolling Magma (B) - Combustion (B) - Cruelty (R) - any other reasonable damage link if you have 4L

    Lvl 28 and Beyond (Drop Rolling Magma):
        Flameblast (B) - Cruelty (R) - Any Damage Support That Applies to Hit/Ignite Portion if Possibile - Any Damage Support That Applies to Hit/Ignite Portion
        Do not Cruelty and Deadly Ailments together on Flameblast, if you have multiple greens, added cold, swift afflication,
        or hypothermia instead. In run, I used swift, but I probably should have used hypothermia as it applies to both hit and ignite via skitterbots chill. If you cannot find gems that work for both portions, place
        preference towards scaling ignite

        Armageddon Brand (B) - Combustion (B) - Any Reasonable Damage Support, Pref towards Immolate (B) - Any reasonable damage support, pref towards Cruelty (R)

	Auras and Utility:
		Herald Of Ash (R) and Skitterbots (B) starting in A2
        Flame Surge (B) at 28
        Determination (R) - Once you have enough reservation efficiency, you can have determ in A7 with Skitterbots. I will typically equip Determ once I get the aura res mastery (sometime during A7)


---Flexible Links---

	Curse:
		Flammability (B). If a blue slot isn't available, Punishment (R) can work. If you only have green slot free, temp chains is fine, its just not ideal.

	Totem:
		Holy Flame Totem (R) until you return to town for Way Forward and then I will use WoC (B) and spell totem support (R). You can use arma brand WoC instead later if you don't like having a totem.

	Whenever you have free sockets:
		Add left-click steelskin (R) once you get vortex you can place steelskin on some other button instead and just press occassionally until you get CWDT


---Notable Pathing---

(1) Witch Spell Damage Start (5pts - Lvl 6)
(2) Arcanist's Dominion (1pt - Lvl 7)
(3) Practical Application (2pts - Lvl 8 w/ Dweller Pt)
(4) Fire Walker (2pts - Lvl 10)
(5) Cruel Preparation via Fire Elemental Damage Path (5pts - Lvl 14 w/ Fairgraves Pt)
(6) 50 Life Mastery on Cruel Preparation (1pt - Lvl 15)
(7) Elemental Overload (4pts - Lvl 18 w/ Way Forward Pt)
(8) Explosive Impact (5pts - Lvl 23)
(9) 100% Hit Damage Against Ignited Enemies Fire Mastery (1pt - Lvl 24)
(10) Heart and Soul (2pts - Lvl 25 w/ Busts Pt)
(11) Dark Arts via top path (4pts - Lvl 28 w/ Piety Pt)
(12) 60% Inc Damage if dual wielding different weapon types (1pt - Lvl 29)
(13) Get 30 Dexterity Node near EO (1pt - Lvl 30)
(14) Purity of Flesh (5pts - Lvl 34 w/ Deshret Pt)
(15) Holy Fire (5pts - Lvl 39)
(16) Get 30 Strength Node Near EO (1pt - Lvl 40)
(17) Life Regen Per Uncapped Fire Res Mastery (1pt - Lvl 40 w/ Miasmeter Pt)
(18) Skills Cost Life Instead of 30% Mana Life Mastery (1pt - Lvl 40 w/ Torments Pt)
(19) Retribution (3pts - Lvl 43)
(20) Precision (2pts - Lvl 44 w/ Tukohama Pt)
(21) Discipline and Training (2pts - Lvl 45 w/ Abberath Pt)
(22) Holy Dominion (2pts - Lvl 46 w/ Ryslatha)
(23) Sanctity (2pt - Lvl 48)
(14) Sovereignty (4pts - Lvl 49 w/ Gruthkul, Kishara's Star, Ralakesh Pts)
(15) Devotion (4pts - Lvl 53)
(16) Acrimony (3pts - Lvl 54 w/ Tolman and Geming Legion Pts)
(17) Small Life Node Near Devotion (1pt - Lvl 55)
(18) Small Life Node Near Heart and Sould (1pt - Lvl 55 w/ Yugul Pt)
(19) Small Life Node Near Cruel Preparation (1pt - Lvl 56)
(20) Quick Recovery (5pts - Lvl 59 w/ Garukhan and Shakari Pts)
** These next two points are leftover points and you can assign wherever you'd like. If I were heading to maps, I would use them to start pathing to Breath of Flames. Here, because run was ending at 60,
I invested in them in best one pointers I could
(21) Aura Master for Inc 10% Effect (1pt - Lvl 59 w/ Vilenta Pt)
(22) Small Aura Effect Node in Sovereignty Aura Cluster

---Notes on Gear---
Attributes are a huge pain for this build. You are going to need to take some of the 30 attribute nodes on tree to help offset having poor RNG at having suffixies open for attribute crafts, for example, if you're resists are omega doomed
priortize fixing resist via crafts instead of using attributes and just get attributes on tree.

Take Rare Amber Amulet from Act 3 Quest - The Ribbon Spool - to help with strength requirements.

Recommend doing den for second QS as it helps with movement for flame dash until you get Leap Slam from Library.

---Gem Acquisition---
Please note that due to currency contraints from run to run, you may not be able to always buy the gems as listed here exactly when they are listed. Likewise, due to color/link constraints, you might not be able to
fit the gem into your gear when you buy it or use it period if proper colors/links do not become available at some point.


    Templar Mule Hillock Reward:
		Take whatever blue gem (b) from Hillock quest and sell it for a scrap. I will keep the default Glacial Hammer gem to use as part of ring ring recipe with an iron ring if needed.
        Mule over Default Ele Prolif Support (B)

	Main Character Hillock Reward:
		Take Rolling Magma (B)

	Hailrake/Submerged Open Reward:
		Take Chance to Poison (G) from Hailrake Quest Reward via Nessa
		Buy Holy Flame Totem (R)
		Take Flamewall (B) from Submerged Quest Reward via Tarkleigh
        Take Frostblink (B) from Second Submerged Quest Reward via Tarkleigh

	Lower Prison Enter Reward:
		Take Combustion (B)

	Brutus Kill Reward:
		Take Flame Dash (B)

	Merveil's Caverns Enter Reward:
		Take Whatever
        Optional: Buy Spell Totem Support (R) if you have extra transmute, otherwise buy when you return to A1 for Way Forward Skill Point

	Fidelitas/Baleful Gem Reward:
		Take Herald of Ash (R)
		Buy Skitterbots (B) if you have extra alteration and want some extra damage for Act 2
        Buy Wave of Conviction (B) for exposure with spell totem support

	Weaver Kill Reward:
		Take Cruelty (R)

	Way Forward Skill Point Act 1 Retrun:
        Buy Spell Totem Support (R) if you haven't
		Optional: Buy Steelskin (R) if you have open red socket and can meet strength requirements. I would then just put steelskin on left click for now.
        Optional: Buy Flame Surge (B), won't use until 28, but if you have extra transmute go ahead. Usually I wait to library to ensure I can get double flat fire crafts

	Clarissa/Tolman Quest:
		Flammability (B)

	Gravicius Quest:
		Take Flameblast (B)
        Buy Armageddon Brand (B)

    Library:
        Either Burning Damage (R) or Swift Aff (G) depending on sockets. Can just skip this reward until later when your socket situation becomes clearer.
        Buy Leap Slam (R)
        Buy Faster Attacks (G)
        Buy Flame Surge (B)
        ---Optional Until 2nd Half Of Campaign. If you don't have by then return and buy. Determ not really used until A7. Bloodrage as soon as you can manage degen. Momentum if you have an extra G link for Leap Slam-Faster Attacks----
            Buy Bloodrage (G)
            Buy Momentum Support (G)
            Buy Determination (R)

	Open Mines Quest:
		Prefernce to take Stone Golem (R), but whatever golem you want is fine. If you want to grab something else instead, go for it. Stone golem is helpful to allow
        you to use

	Open Belly Quest:
		Whatever gem you want. Arcanist Brand (B) is helpful if you want to use WoC as your exposure source instead of using a spell totem or to automate cursing.

	Other:
		I like using steelskin if I have an open red socket. Will not always happen. As result, I will usually either keep one in inventory OR have it leveling in weapon swap for when I do have free red socket.
        It can be quite easy to forget this step though. If you're really swimming in red sockets and have a spare alch, steelskin + CWDT is great.


---Bandit Choice---
Alira or Kill All. Alira provides the most QoL through its resistance bonus and mana regen. Kill all is a good option as well just makes mana management and gearing more annoying. The 2 extra skill points while strong do not
outweigh QoL of alira in campaign enough to make it clearly more worth than Alira. As a result, this decision is a judgment call and can rely a lot on preference.

I would recommend Alira over Kill All for speed leveling purposes. Otherwise, kill all will have more applicability if you're planning on taking the build past campaign.

---Pantheons---
Major: Brine King is a good option to prevent stun lock scenarios and its an easy to just click and forget

Minor:  Ryslatha. Other lessers can be taken for improvements to quality of life, but Ryslatha will typically be best for additional comfort via flask sustain. Gruthkul or Tukohama are good alternatives if you want damage reduction instead of sustain.

---Muling---
Muling templar is recommended for the Ele Proliferation for Rolling Magma for Mudflats and for extra currency/chance a good links for the run. You do not, however, need to mule as this run can
be done perfectly fine without it as witch gets Ele Prolif after Hailrake.

---Wands vs Sceptres---
Use a Goat's Horn as soon as possible to get the flat fire damage implicit. You want to be on look out for two different weapon type bases with fast attack speeds such as 1H sword, 1H axe as once you get the ability to do the flat fire craft
from Solaris 2, you want to craft on those weapons for better leap slam speed AND for the DW mastery giving 60% increased damage if you have two different weapon types.

---Movement Skills---
You will use frost blink into flame dash at 10. You will want to swap to Leap Slam as soon as you do either Library or Lily

---Exposure Source---
Wave of Conviction Spell Totem for automation of exposure for single target as well as providing an additional target for enemies to hit buying you some safety while channeling flameblast in single target scenarios. Can Arma Brand or self-cast
WoC instead if you don't like spell totem

---Library, Lily, Both or None---
You will need to do one of Library or Lily to get Leap Slam. You will be faster and have a better time for support link options if you do Library, so I would highly recommend Library instead of waiting for Lily.